OpenCV 是一个开源库,主要用于处理图像和视频以识别形状、对象、文本等。它主要与 python 一起使用。在本文中,我们将了解如何检测图像中的形状。为此,我们需要OpenCV 的cv2.findContours()函数,并且我们将使用cv2.drawContours()函数在图像上绘制边缘。轮廓是形状的轮廓或边界。
方法
- 导入模块
- 导入图片
- 将其转换为灰度图像
- 对图像应用阈值,然后找出轮廓。
- 在轮廓范围内运行一个循环并遍历它。
- 在这个循环中绘制形状的轮廓(使用 drawContours() )并找出形状的中心点。
- 根据检测到的形状有多少个轮廓点对检测到的形状进行分类,并将检测到的形状名称放在形状的中心点。
使用的功能
- cv2.findContours():基本上这个方法找出图像中所有形状的边界点。
语法:cv2.findContours(src, contour_retrieval, contours_approximation)
参数:
- src:输入图像 n 维(但在我们的示例中,我们将使用
最首选的 2 维图像。)- 轮廓检索:
- cv.RETR_EXTERNAL:只检索极端外轮廓
- cv.RETR_LIST:检索所有轮廓而不建立任何层次关系。
- cv.RETR_TREE:检索所有轮廓并重建嵌套轮廓的完整层次结构。
- 轮廓近似:
- cv.CHAIN_APPROX_NONE:它将存储所有边界点。
- cv.CHAIN_APPROX_SIMPLE:它将存储端点的数量(例如,如果是矩形,它将存储4个)
返回值:轮廓点列表
- cv2.drawContours() :此方法绘制轮廓。如果您提供边界点,它也可以绘制形状。
语法:cv.DrawContours(src、contour、contourIndex、color、thickness)
参数:
- src:n维图像
- 轮廓:可以列出轮廓点。
- 轮廓指数:
- -1:绘制所有轮廓
- 要绘制单个轮廓,我们可以在此处传递索引值
- 颜色:颜色值
- 厚度:轮廓的大小
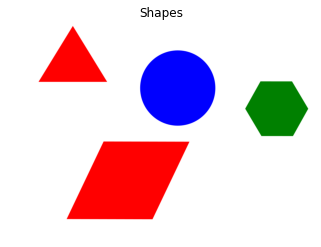
输入:
程序:
- Python3
import
cv2
import
numpy as np
from
matplotlib
import
pyplot as plt
# reading image
img
=
cv2.imread(
'shapes.png'
)
# converting image into grayscale image
gray
=
cv2.cvtColor(img, cv2.COLOR_BGR2GRAY)
# setting threshold of gray image
_, threshold
=
cv2.threshold(gray,
127
,
255
, cv2.THRESH_BINARY)
# using a findContours() function
contours, _
=
cv2.findContours(
threshold, cv2.RETR_TREE, cv2.CHAIN_APPROX_SIMPLE)
i
=
0
# list for storing names of shapes
for
contour
in
contours:
# here we are ignoring first counter because
# findcontour function detects whole image as shape
if
i
=
=
0
:
i
=
1
continue
# cv2.approxPloyDP() function to approximate the shape
approx
=
cv2.approxPolyDP(
contour,
0.01
*
cv2.arcLength(contour,
True
),
True
)
# using drawContours() function
cv2.drawContours(img, [contour],
0
, (
0
,
0
,
255
),
5
)
# finding center point of shape
M
=
cv2.moments(contour)
if
M[
'm00'
] !
=
0.0
:
x
=
int
(M[
'm10'
]
/
M[
'm00'
])
y
=
int
(M[
'm01'
]
/
M[
'm00'
])
# putting shape name at center of each shape
if
len
(approx)
=
=
3
:
cv2.putText(img,
'Triangle'
, (x, y),
cv2.FONT_HERSHEY_SIMPLEX,
0.6
, (
255
,
255
,
255
),
2
)
elif
len
(approx)
=
=
4
:
cv2.putText(img,
'Quadrilateral'
, (x, y),
cv2.FONT_HERSHEY_SIMPLEX,
0.6
, (
255
,
255
,
255
),
2
)
elif
len
(approx)
=
=
5
:
cv2.putText(img,
'Pentagon'
, (x, y),
cv2.FONT_HERSHEY_SIMPLEX,
0.6
, (
255
,
255
,
255
),
2
)
elif
len
(approx)
=
=
6
:
cv2.putText(img,
'Hexagon'
, (x, y),
cv2.FONT_HERSHEY_SIMPLEX,
0.6
, (
255
,
255
,
255
),
2
)
else
:
cv2.putText(img,
'circle'
, (x, y),
cv2.FONT_HERSHEY_SIMPLEX,
0.6
, (
255
,
255
,
255
),
2
)
# displaying the image after drawing contours
cv2.imshow(
'shapes'
, img)
cv2.waitKey(
0
)
cv2.destroyAllWindows()
|
输出: